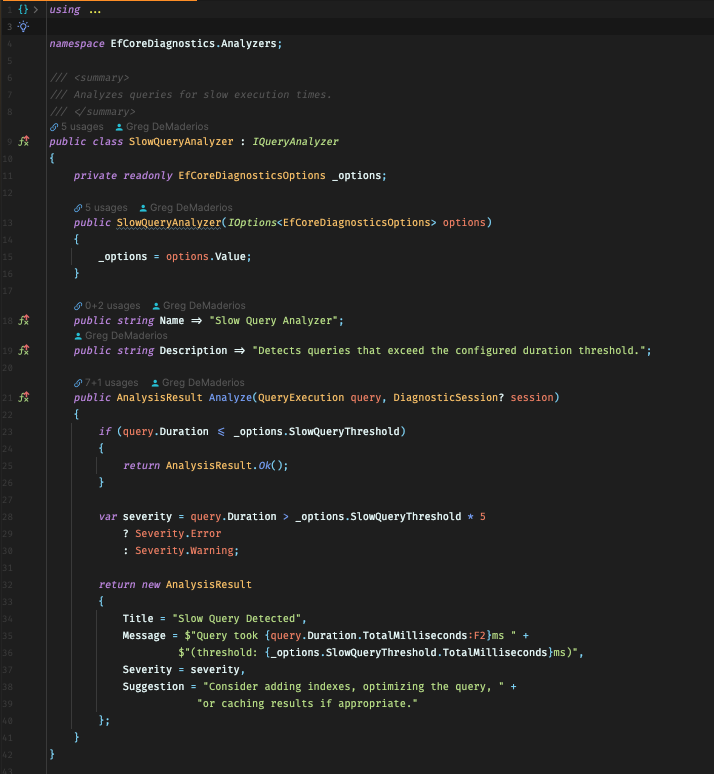
GitKraken or How I Learned to Love Git

I’ll be honest. I don’t have a lot of experience in git.

Most of my experience, for one reason or another is with SVN and TFS.

At my day job, we made the decision to move from TFS to Git (specifically GitHub) and the transition hasn’t been easy….to say the least.

We also decided to utilize branching when we moved to GitHub, which we never did in TFS. I’m not sure why we never used branching with TFS…it wasn’t my choice or decision to make.

I realize that a lot of git gurus are command line all the way but I’m an extremely visual person. In order for me to complete my absorption of knowledge, it helps tremendously to see a visual representation of something. This can take many forms, PowerPoint presentations, flowcharts, diagrams, etc.

Enter GitKraken.

As a beginner GitHub user, GitKraken has been invaluable in understanding Gitflow (which we decided to implement for all the devs). Setting it up per repo is really easy:

Screenshot of GitKraken Gitflow settings

GitKraken does an awesome job of showing you visually, what’s going on with your repo:

Screenshot of how GitKraken diagrams your repositories

You can see in the screenshot above, that I’m working with two branches currently, main and develop. This is a solo project so Gitflow is kind of overkill in this instance. I always have develop checked out and work from that locally. When I’m done and do a commit, I commit to origin/develop and then submit a PR to origin/main from origin/develop. This is a flow that works well for me when I’m working on solo projects.

As of version 7.6.0 of GitKraken, I can also merge my PRs right inside of the client too.

GitKraken has made the move from TFS to GitHub much smoother for me and my team and I cannot imagine doing anymore software development moving forward, without it.

I plan on posting a lot more of my love for GitKraken soon…


useState props

const [activeIndex, setActiveIndex] = useState(null);

Whenever you call useState in React, you get back two elements. The first value will always be its most recent state and the second value is the value you want to set state to.

The const above is called array destructuring and in our particular instance, it’s used to give us direct access to the first element (state) and second element (set state) of useState.

It shortcuts having to do the below:

const colors = ['red', 'green'];
const redColor = colors[0];
const greenColor = colors[1];

And you can shortcut the above by simply doing:

const [redColor, greenColor] = colors;

Which is assigning the first Element in colors, to the variable redColor and the second element in colors, to the variable greenColor.

There are three steps to setting state in Class Components and in Functional Components.

Class Component

// Initialize in the constructor
state = { activeIndex: 0 };

// Reference
this.state.activeIndex;

// Update
this.setState({ activeIndex: 5 });

Functional Component

// Initialize
const [activeIndex, setActiveIndex] = useState(0);

// Reference
activeIndex;

// Update
setActiveIndex(5);
 

Redux Reducers

In my current self directed learning path about React, I’m wrapping my head around Redux and how it’s used to manage state.

In C# we have an Aggregate() method that takes in a collection and spits out a single value. For instance:

IEnumerable<int ints = new List<int> { 4, 8, 12, 16 };
int result = ints.Aggregate((sum, val) => sum + val);

Can you guess what the value of result is? If you guessed (or knew) 40, you’d be correct.

  • First iteration: 4 + 8, returns 12
  • Second iteration: 12 + 12 returns 24
  • Third iteration: 24 + 16 returns the final 40

With regard to state and where Redux comes in, reducers take in an initial state, and an action, to determine the new state. Redux helps us streamline keeping track of state, so that it’s consistent across our apps. The below code snippet is from a reducer I created called alert.js. The import on the first line is simply importing the SET_ALERT and REMOVE_ALERT constants from my types.js file.

I create another constant and set my initialState equal to an empty array. The reducer function takes two params, current state & action and returns a new state based on action.type and action.payload.

import { SET_ALERT, REMOVE_ALERT } from '../actions/types';

const initialState = [];

export default function (state = initialState, action) {
  const { type, payload } = action;
  switch (type) {
    case SET_ALERT:
      return [...state, payload];
    case REMOVE_ALERT:
      return state.filter((alert) => alert.id !== payload);
    default:
      return state;
  }
}

An action is an object that contains two key/value pairs, type & payload. In Redux Reducers, action.type is required and action.payload is optional.

A core tenet of Redux is that it should never mutate state, so you see the use of the spread operator ...state which makes state immutable.


Stateful Components in React

I haven’t dove into state in functional components yet. But I am learning about state in class components.

When building a class in React, it’s helpful to extend (in C# we call this an override (inheritance)) React.Component. In order to pass arguments (props) to this class though, you must pass the props into the class constructor as well as into the parent (React.Component). That’s accomplished by using the super keyword.

The nice thing about state in a React class, is that it’s asynchronous out of the box. We can set off a task in the constructor and when you have a callback function that’s tied to this.setState, React will automatically recall the render method and update the state of that component. See my example below:

Screenshot of Visual Studio Code with some React code
 

How To Start with src and tests Folders in your Solution File in VS2019

Organizing your code into src and tests folders on GitHub seems to be getting more and more popular. However, in Visual Studio 2019, it’s not very easy to accomplish. Here is how I do it.

Firstly, let me show you the final outcome:

To get there requires some Command line. First open a Command window and change to your local root folder for your application. In my case it’s C:\Code\NameOfCoolApp.

Once in the root folder of your application, type this in:

dotnet new sln

You should get something similar to The template “Solution File” was created successfully.

Next, we’re going to stub out one of your projects in the solution, so use whatever your naming convention is here. In my case, we’re going to stub out the Domain project. So from that same command window, type:

dotnet new classlib -o src/NameOfCoolApp.Domain

You should then see something like The template “Class Library” was created successfully and ending with Restore succeeded.

Next, I add a stubbed Unit Test:

dotnet new mstest -o tests/Domain.UnitTests

Following the successful message, we’re then going to add the above two items to the Solution by starting with:

dotnet sln add src/NameOfCoolApp.Domain

And finally:

dotnet sln add tests/Domain.UnitTests

From here you should be able to open the Solution file with VS2019 and be good to move on with the rest of your project within Visual Studio.


.NET Core 3.1 Missing From Target Framework in VS2019

I cloned a repository that was targeting .NET Core 3.1. Trying to run it in VS 2019 ended with this error:

The current .NET SDK does not support targeting .NET Core 2.1. Either target .NET Core 2.0 or lower, or use a version of the .NET SDK that supports .NET Core 2.1.

I looked at the properties of the project and I couldn’t see anything higher than .NET Core 2.2 in my Target frameworks list.

Picture of target framework dropdown in visual studio

I spent more hours that I care to admit to here. I checked that .NET Core 3.1 both x64 and x32 were installed. They were.

I checked that C:\Program Files\dotnet was in my Path. It was.

It turned out that I had a global.json file in my root C:\Code folder, where I have all my local code projects, that was limiting my targeting of any child folders to 2.2.

Picture of sdk version in global.json file in visual studio

I removed that global.json file and voila! I can now see .NET Core 3.1.